How do I pin fields in the issue Assist Agent view?
Last updated: July 13, 2026
You can pin important fields to the top of the issue Assist Agent view so the most relevant issue or account context is always visible while you work.
Pinned fields appear in the header area at the top of the Assist Agent panel, next to the default context pills. This makes it easier to keep high-signal fields—like plan, priority, owner, segment, renewal date, or other custom fields—in view without opening the full issue or account details.
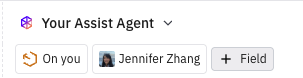
How to pin a field
Open an issue.
Open the issue Assist Agent view.
At the top of the Assist Agent panel, click + Field.
Select the field you want to pin.
After you add a field, it appears at the top of the Assist Agent view for quick reference.
What fields can be pinned?
You can pin fields from the issue or the related account. This includes standard fields and supported custom fields. The product currently supports pinning Issue, Account, and Contact fields.
Is there a limit to how many fields I can pin?
There is no explicit product limit enforced on the number of fields you can pin. In practice, you should only pin the fields your team needs most often so the Assist Agent header stays easy to scan.
When to use pinned fields
Pin fields that help your team quickly understand or route an issue. Common examples include:
Issue priority or status
Issue type or category
Account owner or segment
Plan, tier, or ARR
Renewal date or customer health fields
Choosing a small set of high-value fields helps keep the Assist Agent view focused while still giving teammates the context they need.